Install Ruby on Rails on Windows
This is a step-by-step guide for installing Ruby and Rails on a Windows machine.
Rails uses webpack for WebApps, to package CSS, JavaScript, and other needed assets on the frontend. The Webpacker is a Rails wrapper that provides a standard webpack configuration. To run the WebPacker, Node.js must be installed on the system. If it isn’t, please get it from Node.js webpage (https://nodejs.org/en/) and install it.
What is Ruby?
Ruby (https://www.ruby-lang.org/)is an open-source dynamic programming language focused on developing in a simple and productive way. It has an elegant syntax, it’s easy to understand and to write.
What is Ruby on Rails?
Ruby on Rails (https://rubyonrails.org/) is an open-source framework focused on developing database-driven websites easily. These sites are developed using the MVC (Model-View-Controller) pattern.
What will we install?
We will install:
a) Ruby stable version
b) Ruby official documentation
c) MSYS2 Devkit for developing and building Windows native software
This is all gathered on a setup package called RubyInstalller for Windows.
d) Rails gem
Installation steps
Step 1 — Get RubyInstaller
To get the RubyInstaller application, we need to access the RubyInstaller official webpage (https://rubyinstaller.org/) and then, press the Download button.

We will be redirected to the versions list webpage.
On this page, we can choose to:
a) Download the Ruby installer and the devkit (this is the recommended choice)
b) Download the Ruby installer only
c) Download the Ruby files on a 7-zip file
At this time, the 2 most stable versions of Ruby are:
a) Version 2.7.X, which is the one with more compatible gems (this is the recommended choice)
b) Version 3.0.X, which is the most recent but with less compatible gems.
For this example, we will use Ruby+Devkit 2.7.2–1(x64), since we are using Windows 10 (x64).

Step 2 — Run the RubyInstaller
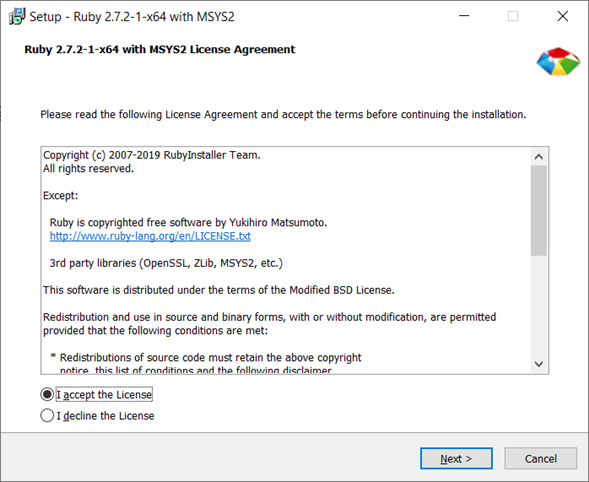
After downloading the installer (about 135MB), we need to launch it. The first screen on the installer shows the license agreement notes and asks us to accept the license and continue, by pressing the Next > button.
Then, we will navigate to the Installation Destination and Optional Tasks screen, where we must define the folder where Ruby will be installed on our Windows PC.

To keep Ruby installed with no additional manual configurations, we must check the following configurations:
- Add Ruby executables to Your PATH. Doing this, Ruby executables will be recognized in any folder on the system.
- Associate .rb and .rbw files to this Ruby installation. Doing this, we will enable the automatic run of a Ruby script by:
- Double-clicking on the file
- Typing the Ruby script file name on a command prompt
- Use UTF-8 as default external encoding. Doing this will set the UTF-8 as the default for Ruby.
After checking (all of) the options we will need to press the Install button to continue to the Select Components screen.

Here we must also check the following components:
- Ruby 2.7.2 base files. We can’t uncheck this because it is the core of the installation.
- Ruby RI and HTML documentation. This is the official Ruby and HTML useful documentation.
- MYSYS2 development toolchain 2020–10–06. MYSYS2 is a set of libraries and tools that are used to build Ruby-based Windows software.
To continue, we must press the Next > button to start the installation.

At the end of the installation, we will be asked to run ridk install to set up MSYS2 and the development toolchain.

To do so, we will need to check the option and press the Finish button.
Step 3 — Run the MSYS2 installer
This step starts automatically after the RubyInstaller setup finishes.

The MSYS2 installer is a command prompt user interface application with 3 choices:
1 — MSYS2 base installation
2 — MSYS2 system update (optional)
3 — MSYS2 and MINGW development toolchain

To have the complete set of tools, we must choose option 3 and press ENTER. The installer will start.
At the end, we will have Ruby and MSYS2 installed on our Windows PC.
Step 4 — Install Rails gem
A gem is a Ruby-coded package that contains a set of libraries to be used on Ruby projects. The Rails gem corresponds to the Ruby on Rails framework, a web framework (full-stack).
To install Rails gem, we must open a Command Prompt window and run the following command:
gem install rails
The installation will start fetching the files it needs.

Then it will start installing them.

At the end, we will see the message with the number of gems installed.

At this time, we are ready to start creating projects on Ruby and Rails.
Now, we are all ready to start creating and maintaining amazing things. We don’t need a good spell-book to do magic. You will need a good wand, and in this case, a wand with some gems on it. Since the Ruby community is always happy to help and onboard interested developers, in this case, the sky is the limit! Happy coding!
